Thursday, April 26, 2007

Garden Update


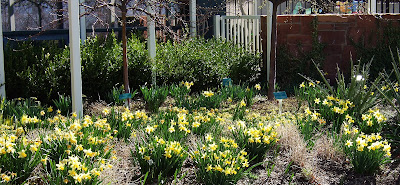
I took these photos two days ago, and already I have more plants that have blossomed. I blame this crazy spring weather in NJ these days. As you can see from the vibrant bunches in the lower two quadrants, the primulae are happily blooming away. I have quite a few different shades of purple, blue and red primulae that just keep coming back year after year. Not shown here are the brilliant yellows planted just in front of the lillies that take over once it stays hot instead of this hot/cold/rain/drought time of April.

The top two photos show some of the newer plantings. On Sunday, Mom and I each bought those peach and purple "Johnny-Jump-Ups" in the upper right quadrant. I'm not sure where she's planted hers yet, but I did take some photos of the orchids in her greenhouse that I'll be posting when she identifies them for me.

Finally, in the top left quadrant, you can see a sample of the plantings I did in the container gardens for Earth Day. Just wish my town would recycle the plastic containers the plants sit in before they're planted in my garden.

Monday, April 23, 2007

Product Review: Blue Silicone Rolling Pin


In an effort to improve my baking skills, I recently ordered and received a new silicone-wrapped rolling pin and pastry mat from The Baker's Catalogue. I have not yet used the pastry mat, so this review will be limited to just the rolling pin.

My old wooden rolling pin works just fine, but it's a French pin, which means that the ends are tapered and, consequently, rolling uniform crusts, cookies and other goods is much more challenging and time consuming. I decided to try the silicone rolling pin rather than another wooden one because silicone has such a good reputation for being non-stick. At the time, both were on sale (unlike now), so the purchase was a bargain as well.

First things first, it's a long pin at 20 in. And, it's heavy. Heavier than I expected, but it made rolling much less work for me. I let the pin do the work, and work it did.

I used it on this recipe to roll out the graham crackers.

Now for the bad news. My dough stuck to the pin. Yes, the pin was sufficiently floured, as was rolling surface and dough. But, it still stuck. Not badly. Not "rip-the-dough-to-shreds" badly at all. But, it stuck nonetheless. On the other hand, it stuck less than my wooden one would have under the same circumstances.

So, how would I rate this device? On a scale of 1-10, probably an 8 because it rolled very well and felt great while I used it, but the silicone should have prevented the dough sticking. Would I buy another one? Probably not. I'd aim for a wooden one with the same dimensions and heft instead.

Sunday, April 22, 2007

Please Visit My New Blog

I hope you'll enjoy my new blog, Altered Plates. Its focus is actually the same as the cookbook I'm writing -- altering recipes to suit my various dietary restrictions.

My dear friend Richard Factor came up with the great name for the book, which I decided to use as the title for the blog since it fits so well. My wonderful husband John helped me alter the site so that it suits my blogging needs.

FYI, Altered Plates will not replace this blog, Here and There. It does however, refocus this blog to simple cooking pursuits, news on Deb's Delectables, gardening and travel. Since Spring is upon us, you can definitely expect much more flower/gardening photos. Altered Plates will be limited to my cooking experiments that involve significantly altering original recipes. All original recipes will be cited and linked if possible.

Please pay Altered Plates a visit and let me know what you think. I'll be updating it at least once a week, unless I'm out of town.

Friday, April 20, 2007

Big, Biga, Biga-ist

In my quest to improve my bread baking (and save money on rolls for John's lunches), I ordered a great sandwich roll pan from King Arthur flour.

I also decided to noodle around with the recipe included with the pan for Stuffed Sandwich Rolls. I decided to make it whole grain by substituting one cup of all-purpose flour for white whole wheat flour. The resulting rolls were nice and fluffy, but not as tasty as my first foray into whole grain baking.

It also was my very first time making a biga. Can anyone please tell me the accurate pronunciation of biga? I said it two different ways on my little video (below), but I'd like to know the correct way. Appreciate your help.

Sub Sandwich Rolls

Yields 5 large sandwich rolls.

Ingredients
:

For the biga:

1 cup all-purpose flour
1 cup white whole wheat flour
1 cup water
1/4 teaspoon instant yeast

Combine, cover and let sit for at least 4 hours.


For the dough:

The biga
2 cups all-purpose flour
2 cups white whole wheat flour
1 cup water
1 tablespoon agave nectar
1 tablespoon salt
1 tablespoons unsalted butter
2 teaspoons instant yeast
2 tablespoons orange juice

Directions:

1. Place the dough ingredients in your mixer and stir everything together to form a shaggy mass.

2. Let the dough rest, covered, in the bowl for 20 minutes.
3. Knead the dough for 8 to 10 minutes until smooth, soft and supple.
4. Place the dough in a lightly greased bowl, cover and allow to rise until doubled in bulk (about an hour).
5. Gently deflate the dough and divide it into 5 pieces. Shape each piece into a rough, slightly flattened oval, cover and let rest for 15 minutes.
6. Working with one piece at a time, fold the dough in half lengthwise and seal the edges with the heel of your hand. Flatten it slightly and fold and seal again.
7. Roll the dough into 10-in. long logs and place in the lightly greased sandwich roll pan. Cover and allow to rise until doubled in size (about an hour).


8. Spritz the rolls lightly with water and bake in a preheated oven for 12 to 15 minutes, until golden brown and the internal temperature registers at least 190 degrees F on an instant-read thermometer.

9. Cool completely on a rack before slicing and filling.

Thursday, April 19, 2007

Happy Birthday to My Blog!

Congratulations to me! This blog of mine is two years old today. This is my 735th post!

Along the way, you have traveled with me to Utah, Maine, New York and Florida. I've made hundreds of chocolates, as well as a variety of other foods. You've also joined me on several garden explorations and watched the progression of my garden here in Somerset, New Jersey.

Thank you to all my readers who have visited over the past two years. I appreciate your support.

To thank you even more, I'm developing a brand new blog just focused on my cookbook writing efforts. I'll premiere it here soon, so keep checking back!

For now, though, here's my Matzo Brei recipe to help those with leftover mazto from Passover.

Matzo Brei

Ingredients:

2 slices of plain matzo
2 slices of egg matzo
4 eggs
2 teaspoons of milk
1 tablespoon of oil
Salt and pepper to taste

Directions:

1. Break the matzo into 2-in. pieces pieces and rinse under warm water for 2 minutes.
2. Drain and place the matzo into a medium bowl.
3. Beat the eggs and milk together, and pour on top of the matzo pieces.

4. Heat the oil in a 9-in. skillet on medium high.
5. Mix the eggs and the mazto together until the matzo is well coated with the egg mixture.
6. Season with the salt and pepper.

7. Add the mixture to the heated pan and spread it out until it's a large matzo pancake.
8. Cook until medium golden brown on both sides.
9. Enjoy!

I like my matzo brei with fake bacon or soy sausage. I wish I could say this is easy to veganize, but you really need the eggs to make it work.

Matzo brei has to be near the top of my list of comfort foods. Although egg matzo is not made all year round, you can still make it with any variety of mazto you can find. Some folks like it served with ketchup (count me among them), while others smear it with jam. Either way, it's yummy stuff!

Tuesday, April 17, 2007

Big Flood of 2007


This is right down the street from our house by another youtube user. About an hour ago, more than 24 hours after that video was taken, Easton Avenue was finally opened. This part of Easton Avenue in Somerset is banked by the Raritan Canal, an overflow of the Raritan River that runs parallel to it and has great bike paths (now under water).

The mighty Raritan topped 10 feet over flood stage, and is still around 4 feet above flood stage. Those poor folks in Bound Brook and the surrounding towns are in really bad shape today.

"Can't get there from here..."

Yesterday, and until about an hour ago, there was no way for us to really cross the Raritan, except via Rt. 27 -- and even then, we would have to wind our way through Highland Park because River Road was completely flooded.

All the exit ramps to/from 287 within a 20 minute drive of our house were closed.

So, all we could do was stay inside, especially given the State of Emergency announced by acting Gov. Codey (poor guy, he's had quite a time of it lately, between Gov. Corzine's terrible accident and this flood!).

Then, the horrendous tragedy of yesterday's murders at Virginia Tech occurred. So, between watching the flood videos and the terrible news on my computer, I decided that I had to go downstairs and keep my hands busy.

I made Graham Crackers from the King Arthur Flour Cookie Companion. The recipe will follow in a separate posting.

Monday, April 16, 2007

Doomed Whole Wheat Baguettes

Did you ever debate with yourself if you should continue on with a recipe, despite the obvious red flags popping up at every turn?

For the sake of my own education, I soldiered on with this recipe, taking short movies of the continuing downward spiral. It was a surprise, too, since the recipe originates in the brand new Bob's Red Mill Baking Book Mom and Dave sent me for my birthday. Oh well.

Here's the recipe, along with the accompanying short movies.

Whole Wheat Baguettes (The original recipe is for Rosemary Baguettes, but I opted out since John was my target audience, and he's not a fan of rosemary-scented anything.)

Ingredients:

1 tablespoon agave nectar
1 1/4 cups warm water
2 1/4 teaspoons active dry yeast
2 teaspoons salt
1 1/2 cups hard white whole wheat flour
2 cups whole wheat flour

Directions:

1. In your mixer bowl, dissolve the agave nectar into the water, then sprinkle the yeast on top and stir. Allow to stand until foamy, about five minutes. (The yeast proofed just fine for me, so it wasn't that.)
2. Add the salt and the hard white flour, stirring well.
3. Stir in 1 1/2 cups of the whole wheat flour to form a stiff dough. (This dough was so stiff, I had to add some orange juice.)
4. Turn the dough out onto a lightly floured surface and knead until smooth and elastic, about 10 minutes. (By some miracle, I got to this point, but it took longer than 10 minutes, and many additions of liquid.)

5. Lightly oil a large bowl, place the dough inside and cover with a clean dish towel. Let the dough rise until doubled in size, approx. 1 hour. (It took closer to 2 hours, despite putting the dough on top of the running dryer.)
6. Line a 17 x 14 in. baking sheet with parchment paper or lightly oil and dust with cornmeal. (I used my new sandwich rolls pan from King Arthur Flour, coated lightly with vegetable oil.)
7. Punch the dough down, divide it in half and return it to the floured surface.
8. Shape each half into a long loaf. Place each loaf down on your prepared pan.

9. Allow loaves to double in size again, another 45 minutes. (Allow much longer than that. I actually let them rise 3 times.)
10. Preheat the oven to 400 degrees F.

11. Using a sharp knife, cut a slash across the top of each loaf, brush with water, and bake for 15-20 minutes, until brown and crisp. (It took closer to 30 minutes for my loaves to finish.)


12. Cool on a wire rack.

It was truly an exercise in patience. The bread was awful.
However, I will give Bob's Red Mill a second chance with another recipe since I really like their products.

Saturday, April 14, 2007

Garden Update


Back in the later days of March, John and I escaped to Utah with the intent of doing some skiing along with visiting his family. However, there had been no new snow, and none to come until the day of our departure, so I suggested that he fish a bit more with his dad. In the meantime, I looked for other non-fishing fun for our days together.

One place that had long been on my list of Salt Lake City wonders to visit was the Red Butte Gardens and Arboretum. Red Butte is located in the foothills of the Wasatch Mountain range that rings the valley of Salt Lake City. It's also part of the University of Utah's scenic campus.


Although spring had not quite sprung yet on the East Coast, it was encouraging to see sunny daffodils decorating the front and back of Red Butte Gardens. From the rear of the Visitors' Center, the gardens open to a large field rimmed with seasonal plants, all carefully tagged and annotated for visitors. Beyond the field are miles and miles of trails, along with a very active children's area.


All this with a fantastic view (on a not-so-polluted day) of the opposing mountains of the valley.

John and I decided to hike along the organized trails first to see what the arboretum had to hold before venturing onto the more vigorous trails around the mountain.


The most fascinating flowers were these unusual hellebores in gorgeous blues and deep reds. I wanted to think that they were mislabeled since they didn't resemble any hellebores I'd ever seen, neither in leaf nor flower. However, that's why it's an arboretum, and I'm a lowly tourist -- to learn something new!


We also saw this different type of magnolia. It's a Yulan magnolia from central China. The blossoms look like waxy white tulips growing from the branches.


The arboretum gardens had plenty of whimsy. They were decorated with life-sized copper moose, deer and assorted fish along the paths. The day we visited, there were plenty of children playing on the statues and having their photos taken while astride the moose. Like the moose John and his dad have seen while fishing, they tend to like quiet, solitary time. Consequently, I waited until the throngs had moved on before taking this moose's photo.


Finally, as I anxiously await the arrival of my Montclair irises, I'll remember with fondness the miniature irises I witnessed in March at the Red Butte Gardens and Arboretum.

Wednesday, April 11, 2007

Birthday Baking

Mom and Dave very kindly bought me a copy of the King Arthur Whole Grain Baking cookbook and the Bob's Red Mill Baking Book for my birthday back in March. Both were very happily received because I've been searching for whole grain recipes to replace the white bread in our lives.

In honor of my high opinion of King Arthur Flour, I gave the Wheat Rolls recipe a go first.

Here it is, adapted from the original recipe, with accompanying photos:


Wheat Rolls

Ingredients:

1 cup lukewarm water
1/4 cup orange juice
4 tablespoons butter
3 tablespoons agave nectar
2 cups whole wheat flour
1 cup unbleached all-purpose flour
1 1/4 teaspoons salt
Heaping 1/2 cup dried potato flakes
1/4 cup nonfat dry milk (I crushed the dried milk I had with a rolling pin until it had the consistency of flour)
2 1/4 teaspoons instant yeast

Directions:

1. Combine all the ingredients, and mix and knead them (I used the mixer) until you have a medium-soft, smooth dough.

2. Cover and allow the dough to rise until quite puffy, though probably not doubled in bulk, 1-2 hours. (Because my house was so cold in March, when I made this recipe, I took advantage of the fact that John was doing the laundry and placed the bowl with the dough on the dryer to help it along in its rising.)
3. Gently (and I do mean gently) deflate the dough and transfer it to a lightly greased surface. Divide it into the number of rolls you wish to make (the original recipe makes 16, but I made 12 long, thick sandwich rolls).
4. Shape each piece the way you wish (I just rolled them with my hands into long tube-like structures), and place each on your lightly greased pan.

5. Lightly oil your rolls and cover them with plastic wrap.
6. Allow the rolls to rise for 1-2 hours. They should be really puffy by then.

7. Preheat the oven to 350 degrees F.
8. Uncover the rolls and bake them until they are deep golden brown on the top, but lighter on the sides (23-25 minutes).

9. Remove them from the oven and transfer them to a cooling rack.
10. Brush tops with melted butter for a soft, satiny crust.

Enjoy!

These rolls came out very well. I used them for sandwiches, as did John, although he said he'd prefer smaller ones for dinner rolls (as they were originally intended). They freeze very well when double bagged in ziplock freezer bags.

Tuesday, April 03, 2007

Two Passover Desserts

Happy Passover!

These two recipes will no doubt wind up in my cookbook since they're
  1. Very much altered to suit sugar-sensitive folks.
  2. Yummy like that!
The first recipe has been adapted from the April issue of Gourmet magazine.

Lemon Macaroons

Ingredients:

4 egg whites
3/4 cup agave nectar
1/4 fresh Mexican vanilla bean scraped for the tiny seeds (or one teaspoon vanilla paste)
zest of one lemon
3 cups reduced fat unsweetened organic finely shredded coconut

Directions:
  1. Preheat oven to 325 degrees F and line a cookie sheet with parchment paper.
  2. Mix together the first four ingredients until very well blended.
  3. Add coconut in stages and mix after each addition.
  4. Use fingers to do final mixing since the dough will be pretty thick.
  5. Use your fingers to form 1 1/2 in. diameter disks about 3/4 in. thick, and place these on the pan about 1 inch apart.
  6. Bake 25 minutes, or until golden brown, turning the pan at 15 minutes.
Makes 40 macaroons.

This recipe is a re-do of the recipe on the can of Yehuda Matzos' Cake Meal.

Passover Carob Pecan Brownies

Ingredients:

5 eggs
2 cups agave nectar
1 teaspoon vanilla paste
3/4 cup oil
1 cup sifted carob powder
1 1/4 cup Yehuda Cake Meal
1 1/4 cup pecans
1 cup unsweetened carob chips

Directions:
  1. Preheat oven to 325 degrees F and grease two 9-in. square pans or one 9 x 13 in. pan.
  2. With mixer, beat eggs, agave nectar and vanilla paste until well blended.
  3. Mix in oil, carob powder and cake meal until well blended.
  4. Stir in pecans and carob chips until just mixed.
  5. Pour batter into prepared pans and bake for 30 minutes.
Reviews: The macaroons are light and refreshing -- just perfect after the heavy Passover meal. The brownies are sweet, and misleading. I worried that they'd taste mazto-ish, but they didn't at all. They're light and satisfying. The chips are especially nice.